How to Build a Giant Mushroom House in Minecraft
JavaBedrockYou live inside the stem of a giant red toadstool. Two floors in the stem, a domed room inside the cap, and a wooden bridge over to a little brown mushroom next door. It's built almost entirely from real mushroom blocks, it glows at night thanks to shroomlights in the gills, and we'll walk you through it from the roots to the white spots on top.
Updated · 11 min read · Java & Bedrock up to 26.3
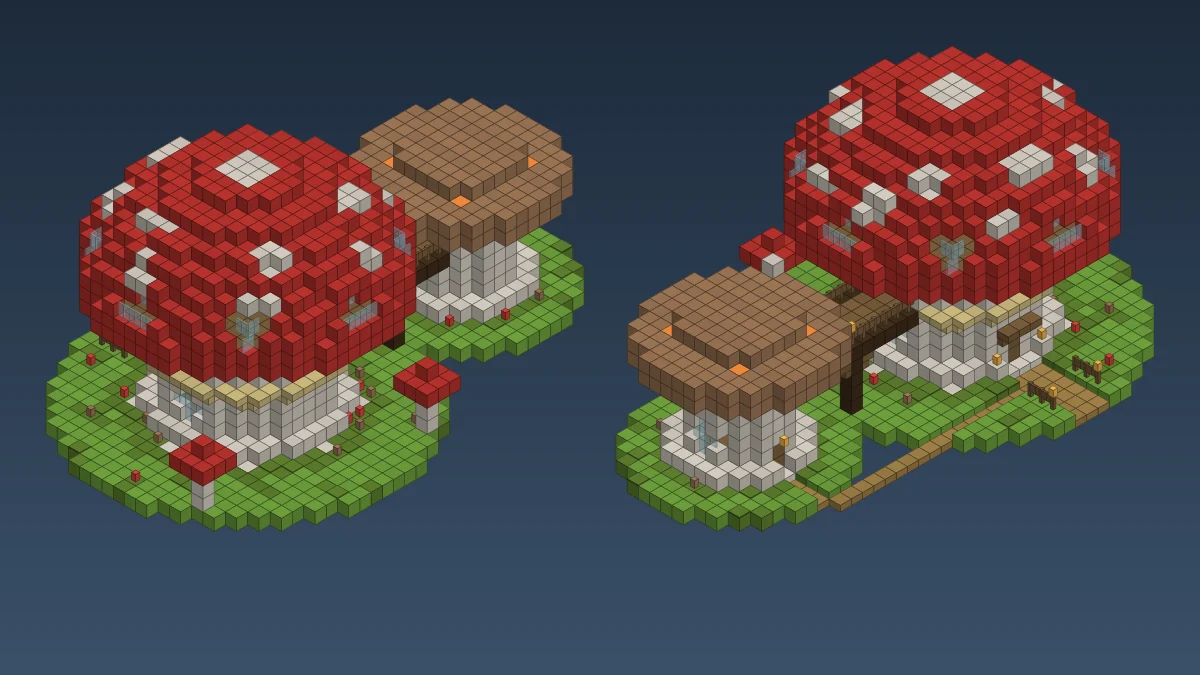
A toadstool you can move into
Every fantasy world needs one. The trouble is that most mushroom houses you see are a huge red cap on a skinny stem, and the only room is a cramped box under the cap with a ladder in it. Cute for a screenshot. Useless for storing a single chest of cobblestone.
So we flipped it. The stem is the house. It's 11 blocks across, which gives you a round room 9 blocks wide on each floor, and there are two of those floors before you even reach the cap. The cap itself is a domed attic room with windows all the way round. Then, because one mushroom looked lonely, we grew a smaller brown one next door and joined them with a bridge.
The plan and the block list
Two mushrooms on one patch of moss. The big red one has an 11-wide stem, a 21-wide cap and three rooms stacked up: a 4-tall ground floor, a 5-tall first floor and the cap room, which is about 6 blocks tall in the middle and 19 across. The little brown one stands to the east with a 7-wide stem, a flat 13-wide cap and two small rooms. The bridge connects the two first floors, 10 blocks long, so you never go outside to get from one to the other.
Loading…
Here's everything, counted straight from the model. The grass, moss and path are the garden; if you build on a meadow that's already there, skip them.
| Block | Count | Notes |
|---|---|---|
| Mushroom stem | 802 | Both stems, the cap underside and the white spots |
| Spruce planks | 495 | All the floors and the bridge deck |
| Red mushroom block | 428 | The big cap and the two baby mushrooms |
| Grass block | 280 | Garden ground |
| Brown mushroom block | 217 | The flat cap next door |
| Moss block | 137 | The mossy rings round both stems |
| Glass pane | 68 | Round windows and cap windows, about 30 glass |
| Dirt path | 38 | Paths to both doors |
| Birch stairs | 35 | The ring round the stem |
| Spruce fence | 34 | Bridge rails, stair rails, garden |
| Moss carpet | 33 | Scattered on the moss |
| Spruce log | 30 | Bridge beams and posts |
| Red carpet | 21 | Rug in the cap room, 14 red wool |
| Shroomlight | 17 | Gills, floors and the dome |
| Spruce stairs | 15 | Both indoor staircases, bridge brackets, door hood |
| Small stuff | 48 | 13 brown and 10 red mushrooms, 9 lanterns, 6 bookshelves, 5 ladders, 4 spruce doors, 1 spruce slab |
All the spruce together, counting the planks that go into fences, stairs, doors and bookshelves, comes to roughly 640 planks, so about 160 spruce logs on top of the 30 you place as logs. A couple of giant 2 by 2 spruce trees get you most of the way. The birch is only 14 logs for the stairs ring.
Roots, stems and the round windows
Mark the middle of the big stem first. Count 5 blocks out in each direction and that's your wall. From there, copy the ring off the plan below; we picked every block by its distance from the middle, so the ring is the same on every layer and it's symmetrical both ways. Build one quarter, mirror it, and if the quarters don't line up you've miscounted.
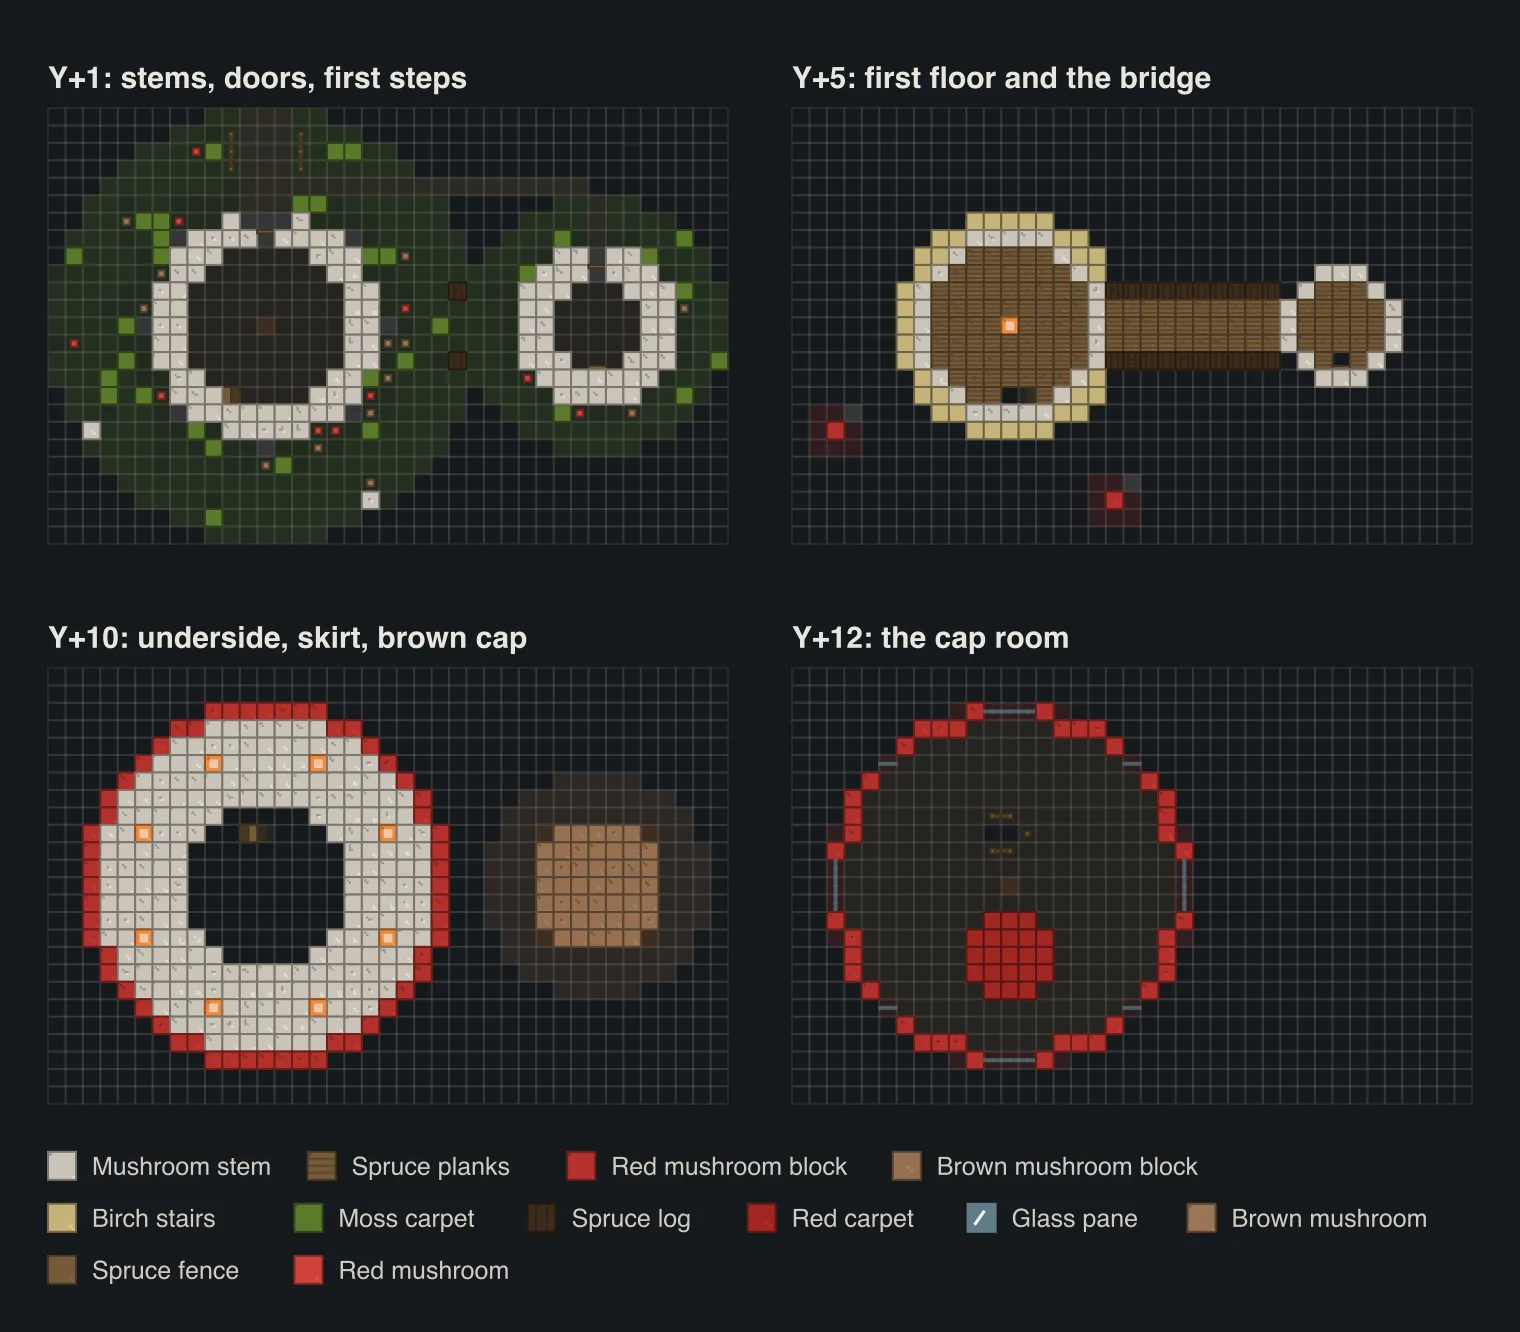
- Y+0: spruce planks inside the stem with a shroomlight in the very middle, then a ring of stem blocks 2 wide round the outside. Add a few single stem blocks poking out further at the corners. Those are the roots, and they make it look like it grew there instead of being placed on top.
- Y+1: a second flared ring round the foot, one block outside the wall, open in front of the door. It's a tiny thing but it kills the "tin can" look a round wall gets.
- Y+1 to +10: the stem wall, straight up. Front door on the north side, a hood of upside-down spruce stairs over it and a lantern each side.
- Round windows: the circle has a flat stretch of 5 blocks on each side. Put a plus shape of glass panes there, 3 tall and 3 wide. Ground floor on the east and west, first floor on the west, south and north.
Don't go thinner than 11. A 9-wide stem looks fine from outside, but the room inside is only 7 across, and once a staircase runs round the wall there's nowhere left for a bed. At 11 the stairs, a bed and a few chests all fit on one floor without you bumping into the wall every two steps.
Floors, the birch ring and the stairs
Y+5 is the first floor, spruce planks again with a shroomlight in the middle. Outside it goes the birch ring: upside-down birch stairs facing in, all the way round except where the bridge comes out. Real fly agarics have a little skirt round the stem, and this is ours. It also breaks up 10 blocks of plain pale wall, which needed it.
The stairs hug the walls. On the ground floor, four spruce stairs climb east along the south wall, then you step off at the landing. Leave the floor open over the top two steps, and put fences round the hole so nobody walks into it in the dark. On the first floor the next run climbs west along the north side, one block in from the wall, five steps up to the cap floor at Y+11. Same deal: two blocks of floor left open and a little fence railing round them.
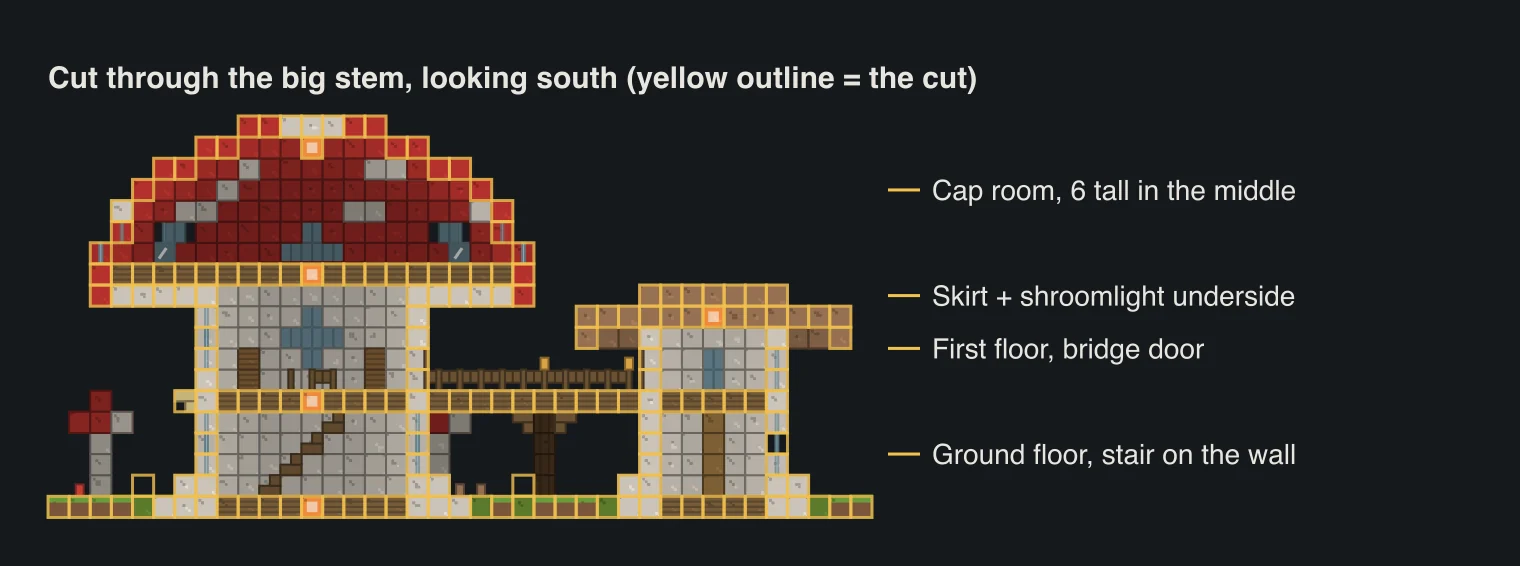
Why not a spiral round a centre post? Because in a stem this size it would eat the middle of every floor. Stairs along the wall leave the middle free, and in a round room the middle is where the good furniture goes.
The cap: underside, brim and dome
Start underneath. Y+10 is the gills: a ring of stem blocks from the stem wall out to 9 blocks from the middle, with eight shroomlights set into it, and a ring of red mushroom blocks round the very edge that hangs down like a skirt. From the garden at night it looks like the whole cap is glowing from below. This is our favourite bit of the build and it costs 8 shroomlights.
Y+11 is the cap room floor, spruce planks 19 wide, plus the outer ring of red that starts the dome. From here the cap goes up and in. It's not a perfect half-sphere. Our first cap was one, 23 wide with a skirt two blocks deep, and from the side it was a red drum that swallowed the stem completely. So we shrank it to 21, cut the skirt to one block, and shaped it by hand: wide and slow for the first three layers, then curling in fast at the top. Now it looks like a toadstool.
- Y+11 to +13: the brim. The radius barely changes, so the walls are nearly upright and you get standing room right out to the edge.
- Y+12 and +13: eight windows round the cap. On the four main sides they're three panes wide with one more pane on top, which gives them a rounded top for free. The four diagonal ones are smaller.
- Y+14 to +18: the crown. Each ring is a block or two smaller than the one under it, and the last one is a small disc on Y+18.
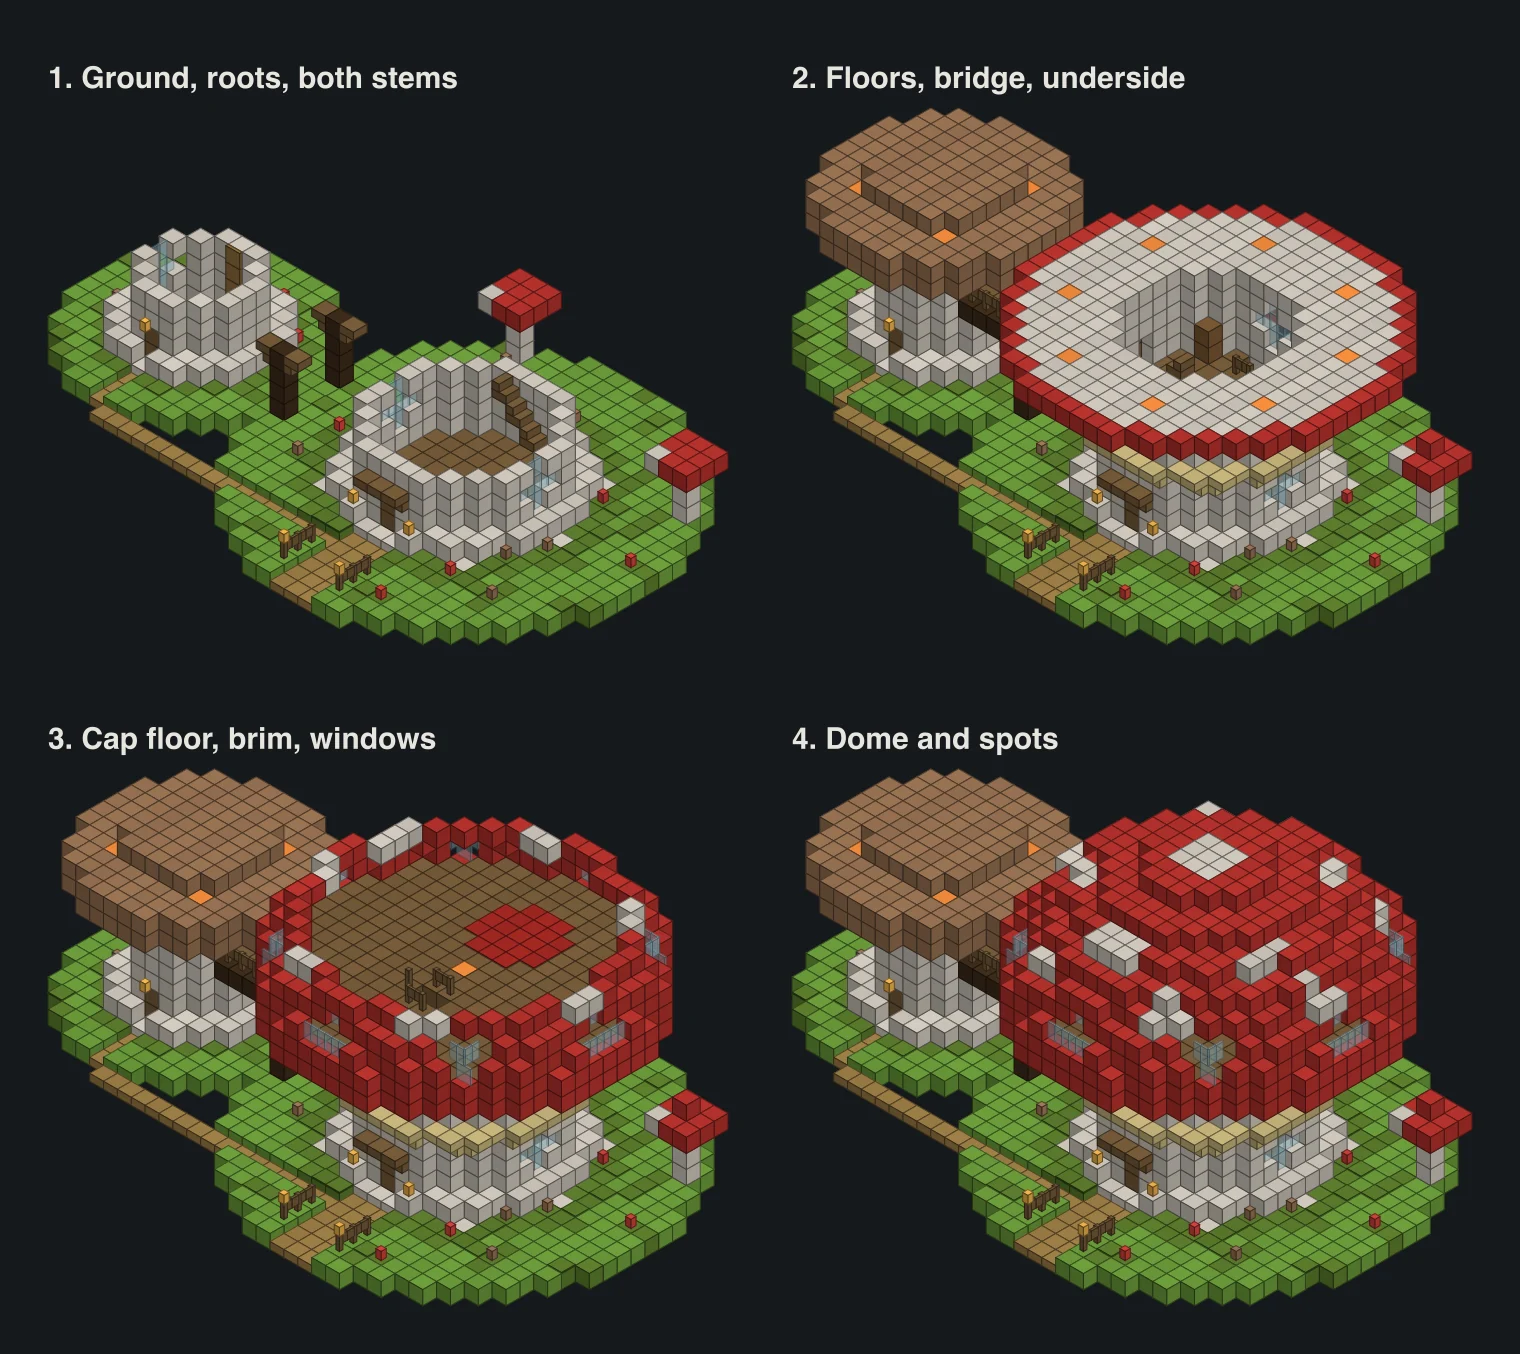
The white spots go on last. Swap patches of red for stem blocks: a ring of seven spots around Y+14, five more higher up around Y+16, and a 3 by 3 on the very top. Don't make them even. Mushrooms aren't, and a perfectly regular grid of spots makes the cap look like a polka-dot dress. Stagger the two rings so no spot sits right above another.
The bridge and the brown mushroom
The bridge comes straight out of a door on the east side of the first floor at Y+5. Two spruce log beams along the edges, three planks between them, fences on top. Halfway across, two spruce log posts hold it up, each with an upside-down stair bracket on both sides. Put a lantern on the fence above each post and two more at the far end.
The brown mushroom is the same idea at half size: a 7-wide stem, a ground floor with its own front door, a floor at Y+5, and a door in the west wall where the bridge lands. Inside, a ladder on the south wall goes from the ground floor up through the floor. The cap is the opposite of the red one on purpose: flat, wide and plain, the way huge brown mushrooms grow. A rim of brown blocks hangs one down at Y+8, the plate is at Y+9 with five shroomlights in it (one right over the upstairs room), and there's a low hump on Y+10 so it isn't completely flat.
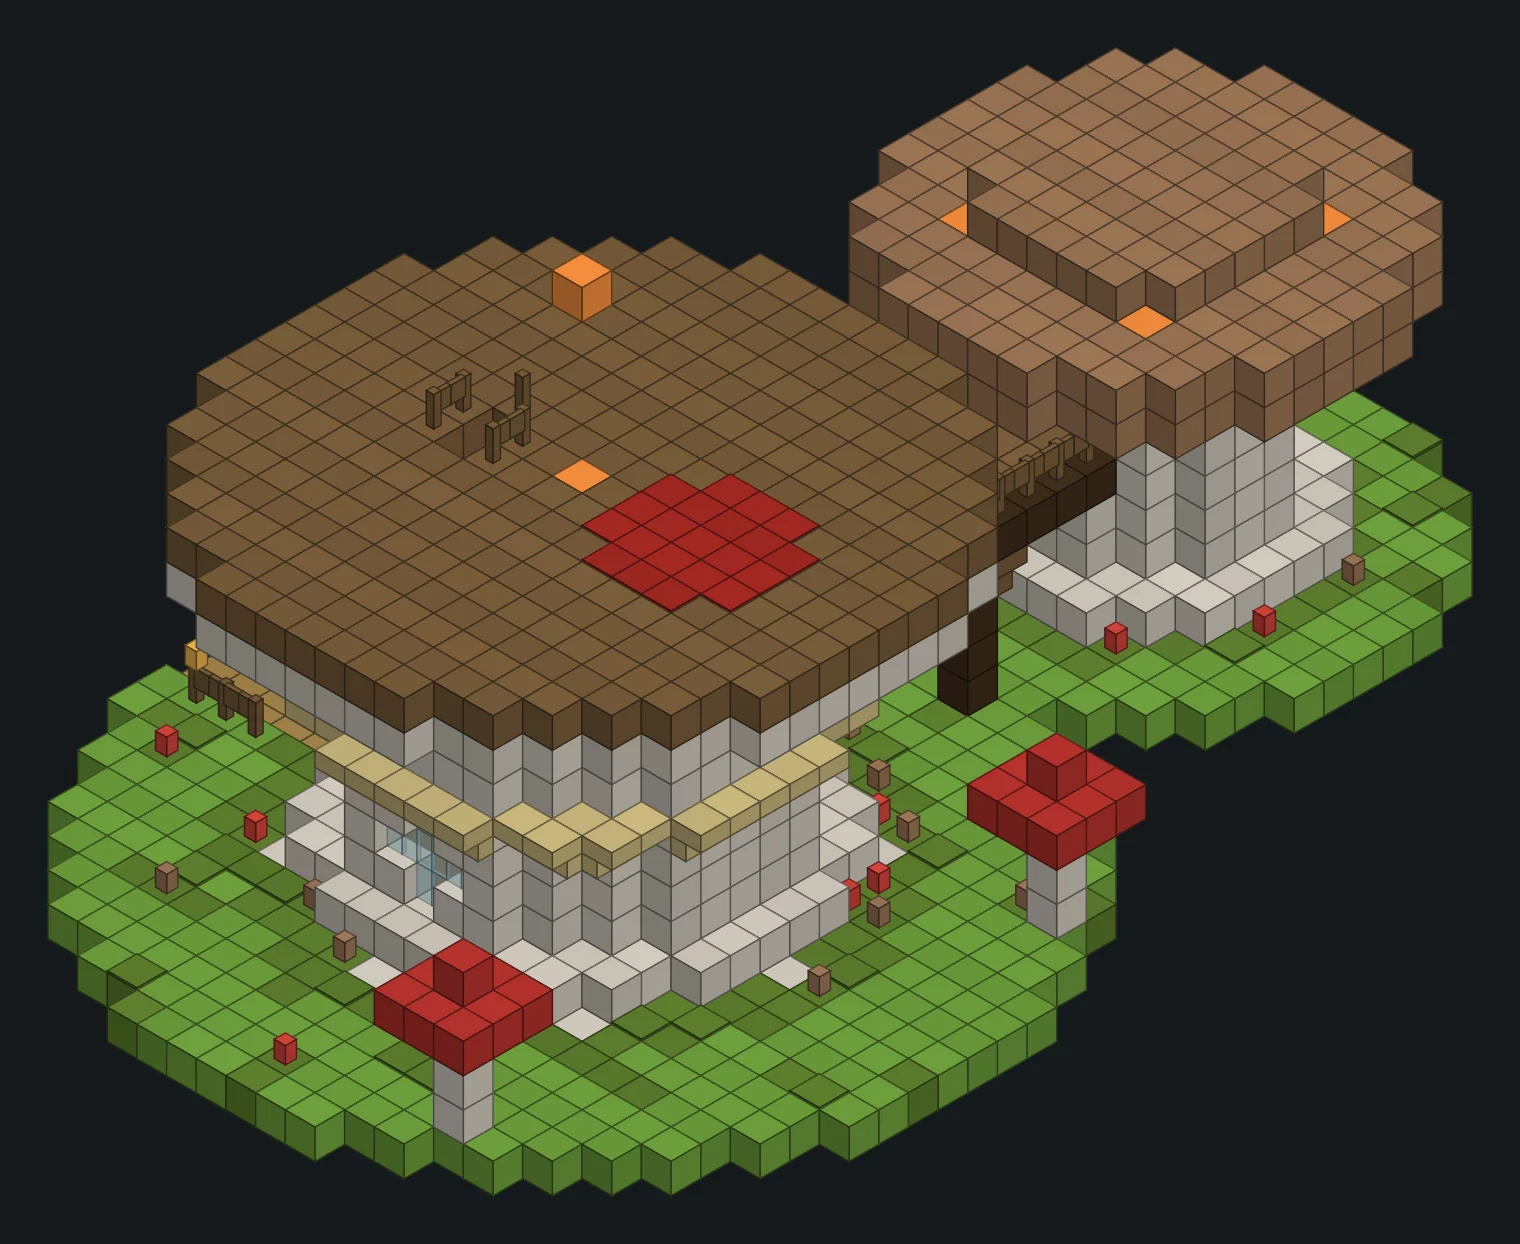
Two red and brown cap shapes side by side is what makes the build read from a distance. With two red domes it looked like a pair of twins. With a flat brown one it looks like a little patch of forest that happened to grow up big.
Inside, lighting and the garden
Shroomlights give off light level 15, the same as glowstone, and they look like they belong in a mushroom. There's one in the middle of every floor, eight in the gills, five in the brown cap and one hanging from the top of the dome. That's 17. Since they come from the huge fungi in the Nether's crimson and warped forests, you can use glowstone for now and swap them later.
The cap room is the living room: a round red rug in the middle, the stair coming up near the north wall, and windows all round. We put bookshelves on the first floor and used the ground floor as storage. The brown mushroom is a good spot for a bedroom, or a brewing room if you want somewhere that smells of mushrooms.
Outside, a ring of moss round each stem, moss carpet scattered on it, and a few dozen real red and brown mushrooms. Two baby toadstools, 5 blocks tall with a 3 by 3 cap, stand at the edge of the garden. A short fence with lanterns lines the front path. It's a lot of tiny pieces but it's what sells the fairy-tale look.
Palette swaps and where to build it
- No Silk Touch yet: red wool or red concrete for the cap, white concrete for the stem and spots, brown terracotta for the brown cap. Swap them for the real blocks later.
- Spooky: crimson wood instead of spruce, a cap of nether wart blocks, warped wart for the little one. Keep the shroomlights.
- Brighter spots: white concrete instead of stem blocks for the spots. They pop more against the red, but you lose the one-material trick.
The obvious place is a mushroom fields biome. The ground is already mycelium, huge mushrooms grow right there for your Silk Touch axe, and hostile mobs don't spawn naturally on them, so your garden stays creeper-free. They're rare and usually out in the ocean, so use the mushroom island finder to see the nearest one on your seed. Our rare biomes guide explains why they hide so far out.
If an island trip is too much, a dark forest or a swamp works too. Both have huge mushrooms growing in them, and the biome finder will show you where they are. Want something less round to build next? Our big layered house uses the same posts-and-depth tricks on straight walls, and the wizard tower is another round build if you've got the hang of circles now.
Questions
How many blocks does the giant mushroom house take?
About 2,700 counting the garden. The big ones are 802 mushroom stems, 495 spruce planks, 428 red mushroom blocks and 217 brown mushroom blocks. Without the grass, moss and paths it's a bit under 2,250.
How big is the mushroom house?
The whole plot is 39 by 25 blocks and 19 layers tall. The big stem is 11 blocks across and the red cap is 21 across. The brown mushroom has a 7-wide stem and a 13-wide cap.
How do you get mushroom blocks in survival?
Mine huge mushrooms with a Silk Touch tool; an axe is fastest. Without Silk Touch they drop small mushrooms instead. To grow more, plant a red or brown mushroom on mycelium or podzol and use bone meal on it.
Can I build it without going to the Nether?
Yes. Shroomlights are the only Nether block in it. Use glowstone or lanterns until you can get to a crimson or warped forest.
Does the mushroom house work on Bedrock?
Yes. Every block in it exists on Java and Bedrock, and the stairs, doors, ladders and panes place the same way on both.
Related guides
Finders and tools in this guide
Written by the Minecraft Tools team from the same world-generation engine that runs the seed map. Coordinates quoted here were computed with it for the stated seed, edition and version, and the engine is tested against the real game.