How to Build a Storybook Cottage in Minecraft
JavaBedrockMost cottage builds are tiny. This one only looks tiny. The roof does all the work: it flares out at the bottom like a bell, so the whole house seems to sink into the garden, and underneath it there's a two-room ground floor, a vaulted kitchen wing and a loft. Here's every layer, and the exact blocks we used.
Updated · 10 min read · Java & Bedrock up to 26.3
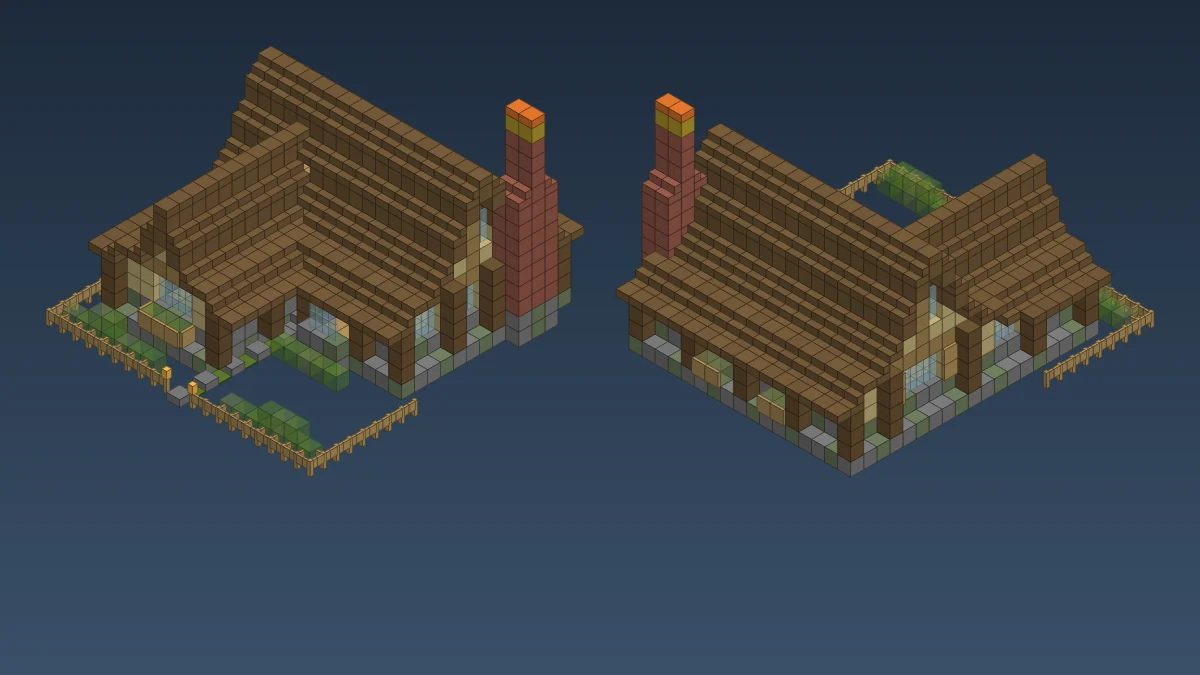
It's all about the roof
A normal Minecraft roof goes up one block for every block in. Straight line, 45°, done. It works, but it looks like a tent. Real storybook cottages have roofs that curve: almost flat where they meet the walls, then steeper and steeper toward the ridge. Blocks can't curve, but you can fake it really well by changing how fast each course climbs.
That's the whole idea of this build. Low walls, a big curved roof that sits down over them, a smaller wing with the same curve squeezed narrower, and enough little details (shutters, window boxes, a smoking chimney) that it feels lived in. We went through three roof profiles before this one looked right from the garden gate. The first was too pointy, the second looked like a mushroom.
Layer by layer: the whole build
Step through the layers below, turn the 3D view, and check what each layer needs before you start it. Y+0 is the cobblestone plinth that sits on the grass.
Loading…
| Block | Count | What it's for |
|---|---|---|
| Oak planks | 243 | Both floors |
| Spruce stairs | 201 | Roof courses |
| Spruce planks | 122 | Roof, where the curve goes steep |
| Spruce slabs | 107 | Roof flare and ridge |
| Cobblestone + mossy cobblestone | 123 + 63 | Plinth, base course, chimney foot |
| Birch planks | 93 | Wall infill, gables, attic partition |
| Stripped oak logs | 75 | Beam round the top of the walls, gable posts |
| Glass panes | 62 | Windows and the bay |
| Bricks | 50 | Chimney (plus 4 brick stairs) |
| Oak logs | 52 | Posts |
| Oak fences | 36 | Garden |
| Azalea + flowering azalea leaves | 19 + 12 | Hedges, flower bed, window boxes |
| Oak trapdoors | 13 | Shutters and window boxes |
| Small stuff | 5 cobblestone slabs, 4 moss carpets, 4 oak stairs, 3 lanterns, 2 campfires, 2 hay bales, 1 cobblestone stair, 1 oak door |
The roof eats about 120 spruce logs once you turn them into stairs, slabs and planks, so plan a proper spruce run first. A taiga with a few 2 by 2 giant spruces makes it painless. Bricks are the other slow part: every brick block is four bricks, so the chimney alone is 200 bricks of smelted clay. If that sounds like a chore, stone bricks or cobblestone make a fine chimney too.
Footing, walls and posts
Start with the plinth on Y+0. It's an L shape: the main body is 15 by 11 inside the walls, and the wing sticks out 6 blocks from the front on the east end, 7 wide. The plinth runs one block wider than the walls all round, mixed cobblestone and mossy cobblestone, with oak planks inside. Mixing the two stones by eye looks better than any pattern. We used roughly one mossy in three.
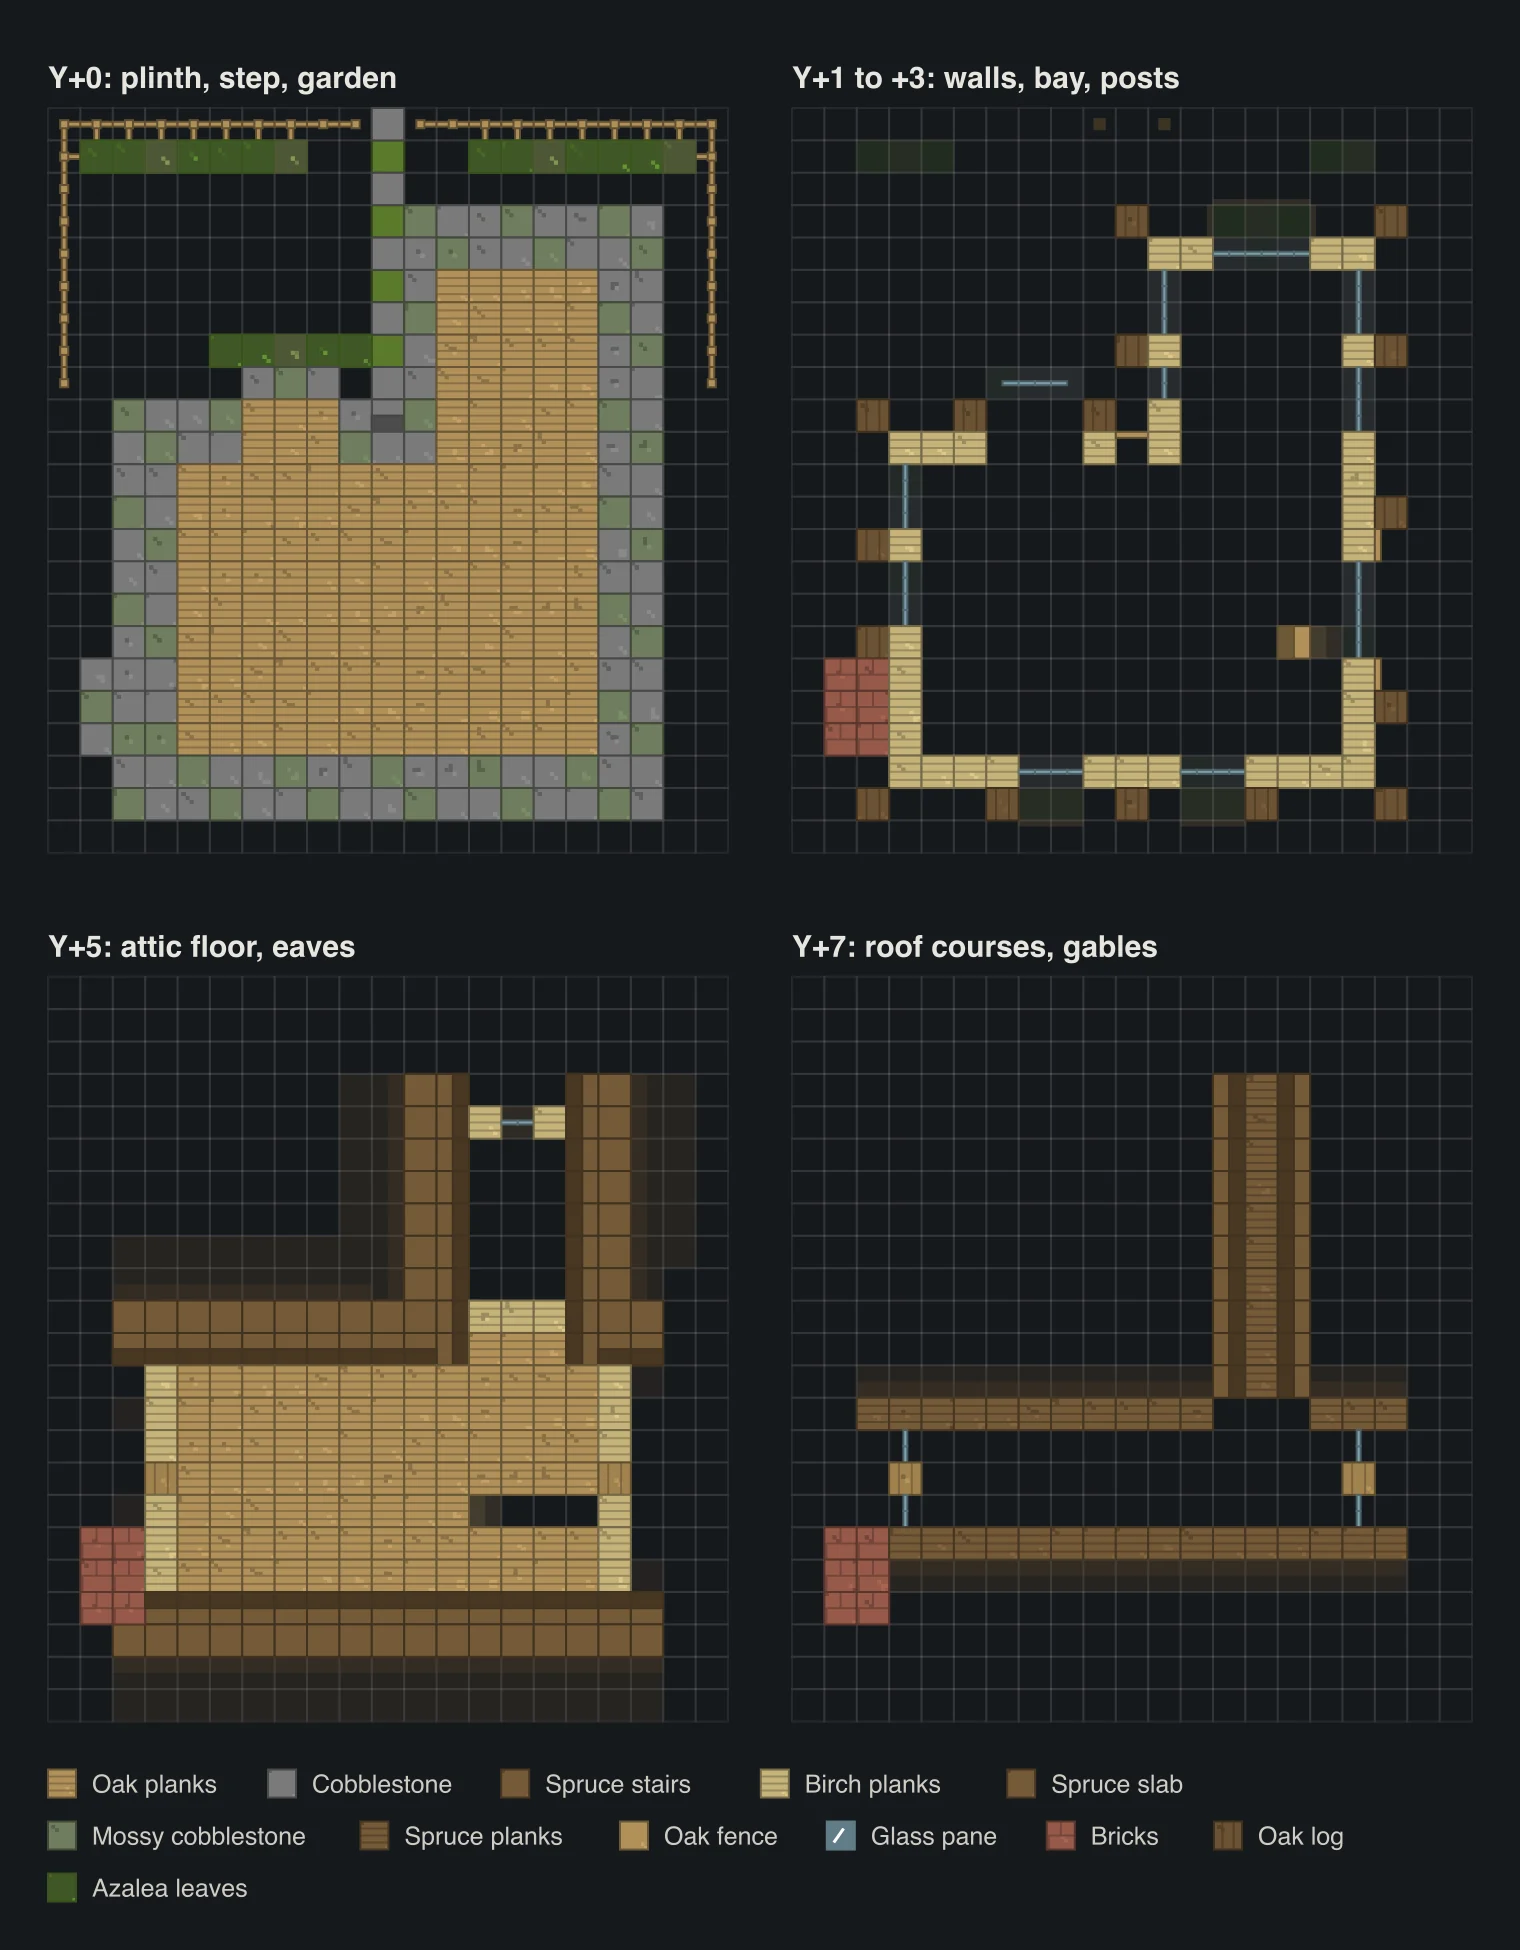
- Y+1, the base course. Cobblestone and mossy cobblestone on the wall line. This gives the house a stony skirt and hides where the floor meets the wall.
- Y+2 to Y+3, the infill. Birch planks, with glass panes where the windows go. Our windows are 1 to 3 panes wide and always 2 tall, which is plenty on walls this low.
- Y+4, the beam. A ring of stripped oak logs laid sideways on top of every wall, main body and wing. Use an axe on oak logs to strip them. This is what the roof sits on.
- The posts. Plain oak logs standing on the plinth one block outside the walls, not in them. Under the eaves they're 3 tall and stop right under the roof, so it looks like they're holding it up. On the gable ends there's no eave above them, so run those up to beam height. The dark bark against the pale birch is the contrast that makes the walls read from far away.
The front of the main body is mostly hidden by the bay and the wing, which is the point. The door goes in the corner between them, tucked under the eave, with a cobblestone stair as the step and a lantern hanging above it. It feels like a little porch without building one.
The bay window
Cottages need a bay. Ours is 3 glass panes wide and sticks out 2 blocks from the front wall. Knock a 3-wide hole in the front wall from Y+1 to Y+3, put a mossy base course and two rows of glass panes on the cell two blocks out, and the two front posts close off the sides. From above it's a rounded bump: post, three panes, post.
The clever bit is the roof. The main eave hangs 2 blocks out from the wall at Y+4, which is exactly how far the bay sticks out. So the bay doesn't need a roof of its own. It just slots in under the flare. A bed of azalea leaves along the front of it finishes it off.
Building the bell roof
Here's the curve, course by course from the front eave in. Each step is one block further in toward the ridge:
| Blocks in | What goes there | Climb |
|---|---|---|
| 2 out from the wall | Bottom slab on Y+4 | Flare |
| 1 out | Stair on Y+4 | Half a block |
| On the wall | Bottom slab on Y+5, sitting on the beam | Half a block |
| 1 in | Stair on Y+5 | Half a block |
| 2 in | Stair on Y+6 | One block |
| 3 in | Plank on Y+7, stair on Y+8 | Two blocks |
| 4 in | Plank on Y+9, stair on Y+10 | Two blocks |
| 5 in (ridge) | Plank on Y+10, bottom slab on Y+11 | Half a block |
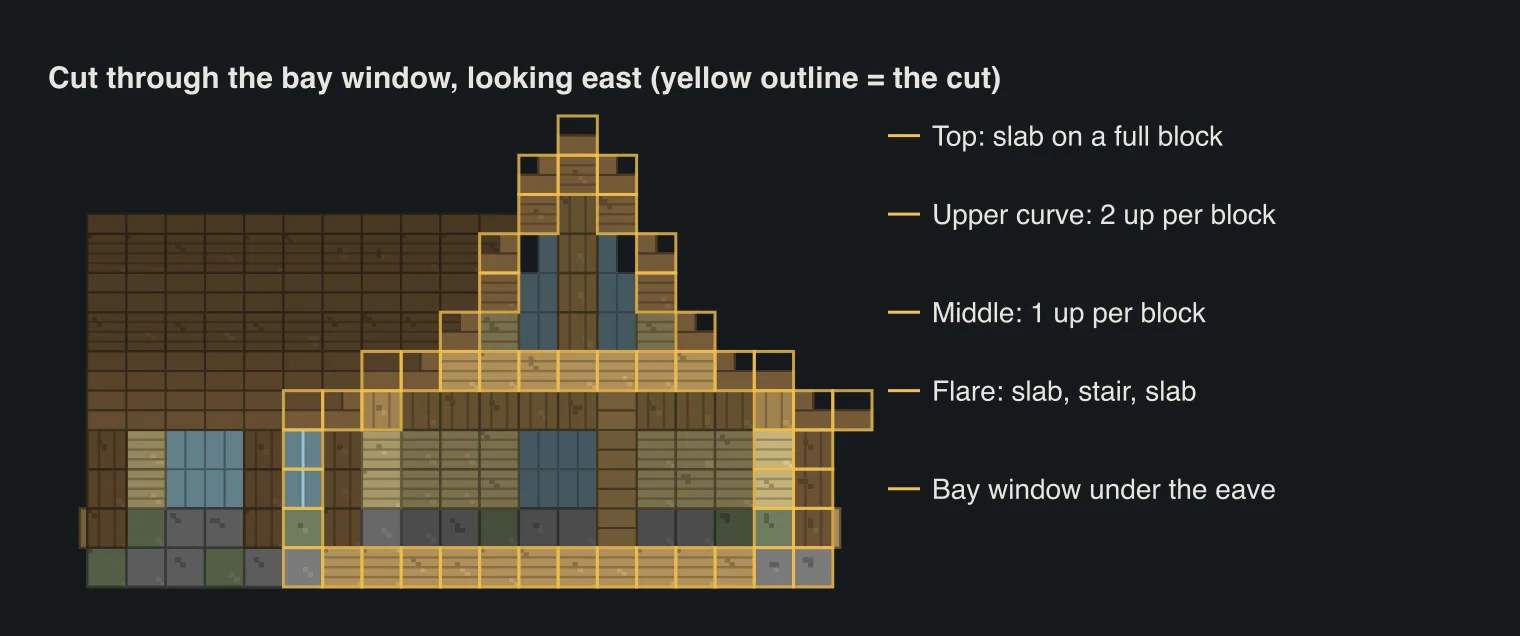
The flare is the part people get wrong. Slab, stair, slab, stair, each only half a block higher than the last, so the eave almost lies flat. Then one course at a normal 45°, then two courses that climb two blocks each with a plank under the stair. Run every course the full 17 blocks from one gable overhang to the other, and fill the gables under it with birch, a stripped oak post up the middle and two attic windows.
The wing and the valley
The wing has the same flare but only 7 blocks to climb across instead of 11, so it gets one steep course and then a peak: plank on Y+6 with a stair on Y+7, then a stack of two planks and a slab for the ridge at Y+9. Its ridge ends up two layers lower than the main one, which is exactly what you want. Two roofs at the same height look like a warehouse.
Where the wing roof runs back into the main roof you get a valley. Build the wing's courses back toward the house until each one disappears under the main roof, and leave out any main-roof block that would sit under the wing's surface. It sounds fiddly. It's mostly common sense once you're up there, and the 3D view in the viewer above shows exactly which blocks survive.
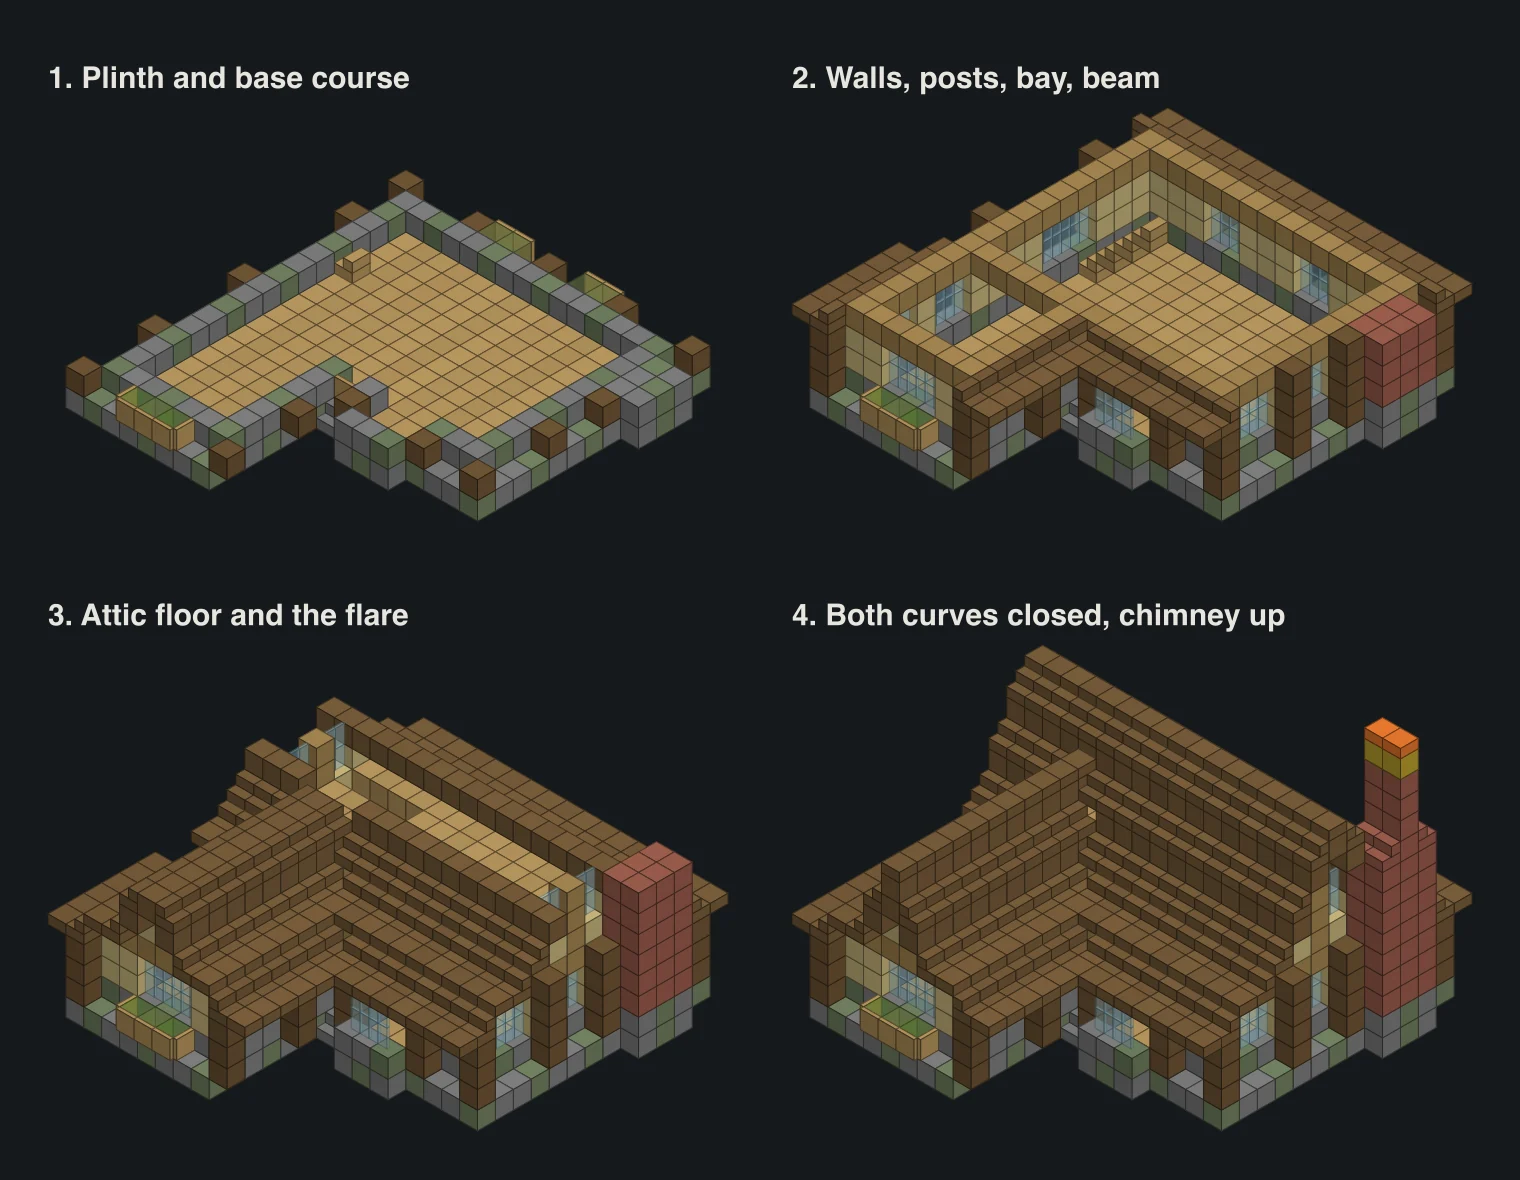
Inside, the wing has no attic. It's open right up to the ridge, 6 blocks of headroom in the middle, which makes it the obvious kitchen. A birch partition above the beam closes it off from the main attic.
Chimney, shutters and the little stuff
- Chimney: 2 by 3 bricks outside the back of the west gable, stepping in with brick stairs at Y+9 to a 2 by 1 stack. It goes up through the roof overhang and ends with campfires on hay bales at Y+14. A hay bale under a campfire makes the smoke go much higher, which looks great over a curved roof.
- Shutters: open oak trapdoors on the east wall either side of the big window. An open trapdoor stands up against the side of its block.
- Window boxes: flowering azalea leaves just outside the back windows and under the wing window, with open trapdoors in front as the box. Leaves you place yourself never decay, so they stay put.
- Lanterns: one hanging over the door from the eave, and one on each gate post. A lantern placed on top of a fence just sits there; placed under a block it hangs.
Azalea leaves come from the azalea trees that grow over lush caves. Bring shears, because breaking leaves by hand only drops saplings and sticks.
Inside, the garden, and where to put it
The ground floor is 4 blocks high under the attic floor, with the wing open to the main room through a 5-wide archway under the beam. Four oak stairs climb from the east end up to the loft along the middle of the house, the only place the attic is tall enough to stand. Up there you get a strip about 3 blocks wide and 3 to 4 high under the ridge, with a window in each gable. It's a bedroom, not a ballroom. That's very cottage.
The garden is a fence line a few blocks in front of the wing, with a gate gap at the path, azalea hedges along the inside, and stepping stones of cobblestone slabs and moss carpet up to the door. Keep it small. A huge lawn makes the house look smaller.
Palette swaps that work: cherry planks for the infill and dark oak for the roof in a cherry grove, or spruce everything with a stone base for a witchy forest cottage. Whatever you pick, keep the walls pale and the posts and roof dark, because the contrast is half the charm.
For a spot, you want flat-ish ground with trees nearby: a flower forest, a meadow or a cherry grove. The biome finder shows those on your seed, and the cherry grove finder jumps straight to the pink ones. If this is your first big build, our layered house guide explains the post-and-recess wall trick in more detail.
Questions
How do you make a curved roof in Minecraft?
Change how fast each course climbs. Start at the eave with slabs and stairs that only rise half a block per block, then do a course at one block per block, then stack a full block under the stair so the top courses rise two per block. From the side the steps read as a curve.
How many blocks does the storybook cottage need?
1,298 with the garden, 1,227 without. The big ones are 243 oak planks for the floors, 201 spruce stairs, 122 spruce planks and 107 spruce slabs for the roofs, 186 cobblestone and mossy cobblestone, and 93 birch planks.
Does this cottage work on Bedrock?
Yes. Every block is on both editions, and stairs, slabs, trapdoors and lanterns place the same way. The only difference is how you see coordinates while marking out the plinth: F3 on Java, Show Coordinates in the world settings on Bedrock.
How do I make the chimney smoke go higher?
Put a hay bale under the campfire. It turns into a signal fire and the smoke column goes a lot higher. We put one under each of the two campfires on top of the chimney.
Can I build it without the wing?
You can, but move the door to the middle of the front and keep the bay. The wing is what stops the roof from being one big slab of spruce from the garden, so if you drop it, add a dormer or two on the front slope instead.
Related guides
Finders and tools in this guide
- Biome FinderSearch for any biome, from cherry groves to mushroom fields and deep dark.
- Cherry Grove FinderThe pink 1.20 cherry grove biome highlighted on your seed's map.
- Village FinderLocate villages by biome type — plains, desert, savanna, taiga and snowy.
- Coordinate CalculatorConvert between block, chunk and region coordinates, and measure distance.
Written by the Minecraft Tools team from the same world-generation engine that runs the seed map. Coordinates quoted here were computed with it for the stated seed, edition and version, and the engine is tested against the real game.